Oleria’s Trustfusion platform offers a central place to continuously monitor and manage access for all identities – human, non-human, and AI – across all systems: on-prem, in the cloud, or custom. It provides adaptive and autonomous access security that sets your business free. As part of that promise, we integrate your Workday into the Oleria platform.
This document provides step-by-step guidance for integrating Workday with your Oleria workspace.
Pre-requisites
- Administrator permission on the Oleria workspace
- Workday admin credentials.
Note : Please use a service account (and not an employee account) with the suggested privileges for the integration to ensure continuity
Steps to Integrate Workday with Oleria workspace
Step 1: Create an Integration System User (ISU) in Workday
Create an Integration System User and grant View Only permissions.
1.1. Log in to Workday. Type Create integration system user in the search window and select the task.
Create an integration system user window opens and provide the following
- User Name
- Password
- Set session timeout minutes to 0
- Select the checkbox Do Not Allow UI Sessions

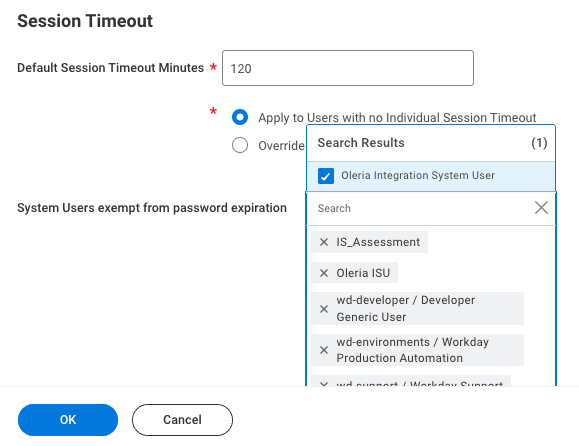
1.2. Exempt the Oleira Integration System User from password expiration
In the search windows, type Maintain Password Rules and select the task.
In the System Users exempt from password expiration, search and add the Oleria Integration System User
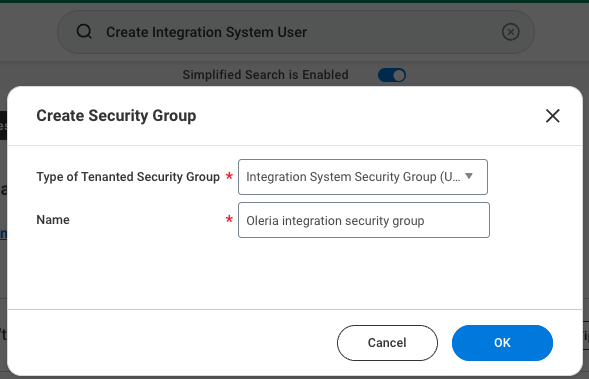
1.3. Create an integration security group
In the search window, type Create security group and select the task.
From the Type of Tenanted Security Group dropdown, select Integration System Security Group (Unconstrained), and give a name, for example, Oleria Integration Security Group.
1.4. Add Oleria Integration System User to the Security Group
From the Integration System User, search and select the Oleria Integration System User created in step 1.1.

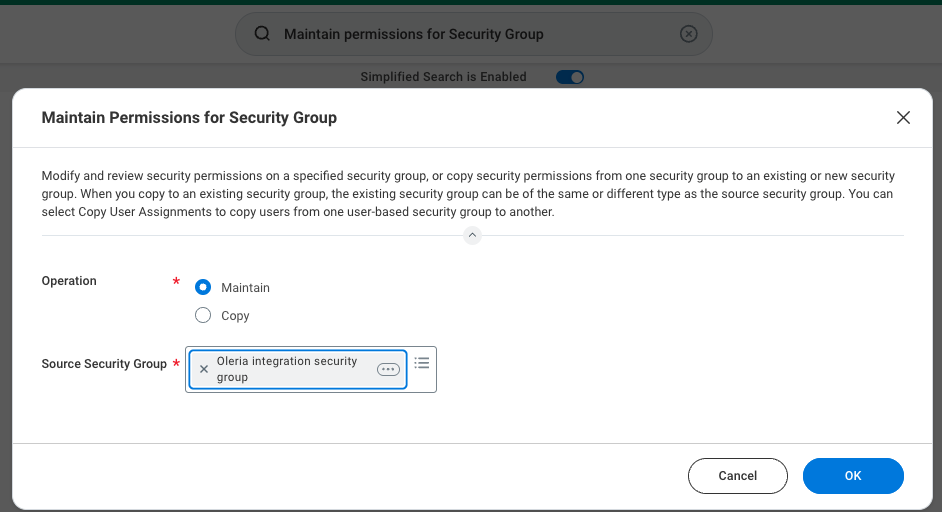
1.5. Add permissions to the Security Group
In the search window, type Maintain permissions for Security Group and select the task.
Search and add the Oleria Integration Security Group created in step 1.3 in the Source Security Group.
Click Ok.
In the Maintain Permissions for Security Group → Domain Security Policy Permissions, add the following permissions as shown in the following screenshot
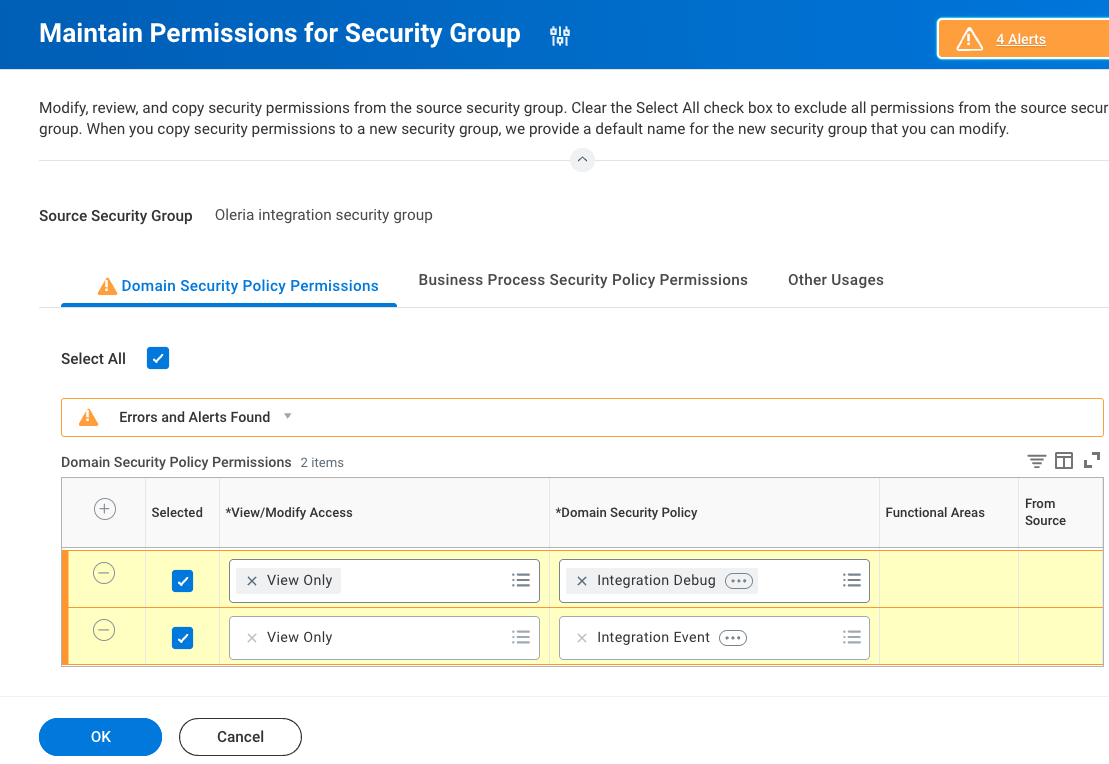
List of all required permissions:
- ("View Only", "Integration Event", "Integration")
- ("View Only", "Integration Debug", "Integration")
- ("View Only", "Integration Process", "Integration")
- ("View Only", "Integration Build", "Integration")
- ("View Only", "Worker Data: Workers", "Staffing")
- ("View Only", "Person Data: Personal Data", "Personal Data")
- ("View Only", "Worker Data: Employment Data", "Staffing")
- ("View Only", "Worker Data: Staffing", "Staffing")
- ("View Only", "Worker Data: Public Worker Reports", "Staffing")
- ("View Only", "Worker Data: Organization information", "Staffing")
- ("View Only", "Person Data: Personal information", "Personal Data")
- ("View Only", "Person Data: Name", "Contact information")
- ("View Only", "Person Data: Person Reports", "Personal Data")
- ("View Only", "Worker Data: Service Dates", "Staffing")
- ("View Only", "Worker Data: Current Staffing Information", "Staffing")
- ("View Only", "Person Data: Public Work Email Address Integration", "Contact information")
- ("View Only", "Person Data: Private Work Email Integration", "Contact information")
- ("View Only", "View: Supervisory Organization", "Organizations and Roles")
- ("View Only", "Person Data: Private Home Email Integration", "Contact information")
- ('View Only', 'Person Data: Public Home Email Address Integration', 'Contact Information')
- ('View Only', 'Person Data: Home Contact Information', 'Contact Information')
- ('View Only', 'Worker Data: Employee Contracts', 'Staffing')
- ('View Only', 'Worker Data: All Positions', 'Staffing')
- ('View Only', 'National ID Identification', 'Personal Data')
- ('View Only', 'Manage: Supervisory Organization', 'Organizations and Roles')
- ('View Only', 'Indexed Data Source: Workers', 'Staffing')
- ('View Only', 'Reports: Organization', 'Organizations and Roles')
- ('View Only', 'Worker Position: View', 'Staffing')
- ('View Only', 'Person Data: Work Contact Information', 'Contact Information')
- ('View Only', 'Person Data: ID Information', 'Personal Data')
- ('View Only', 'Job Information', 'Jobs and Positions')
- ('View Only', 'Staffing Actions: Additional Job Classifications', 'Staffing')
- ('View Only', 'Staffing Actions: Primary Job', 'Staffing')
- ('View Only', 'Worker Data: Job Family on Worker Profile', 'Staffing')
- ('View Only', 'Worker Data: Directory', 'People Experience'),
- ('View Only', 'Worker Data: General Staffing Information', 'Staffing'),
- ('View Only', 'Worker Data: Job Details', 'Staffing')
- ('Get Only', 'Worker Data Current Job Profile Information', 'Staffing'),
- ('View Only', 'Worker Data: Active and Terminated Workers', 'Staffing'),
- ('View Only', 'Worker Data: Business Title on Worker Profile', 'Staffing'),
- ('View Only', 'Worker Data: Current Job Profile Information', 'Staffing'),
- ('View Only', 'Staffing Actions: Job Profile', 'Jobs & Positions'),
- ('View Only', 'Job Profile: View', 'Integration'),
- ('Get Only', 'Integration Event', 'Integration'),
- ('Get Only', 'Integration Build', 'Integration'),
- ('Get Only', 'Integration Process', 'Integration'),
- ('Get Only', 'Integration Debug', 'Integration'),
- ('Get Only', 'Worker Data: Organization Information', 'Staffing'),
- ('Get Only', 'Worker Data: Public Worker Reports', 'Staffing'),
- ('Get Only', 'Worker Data: Current Staffing Information', 'Staffing')
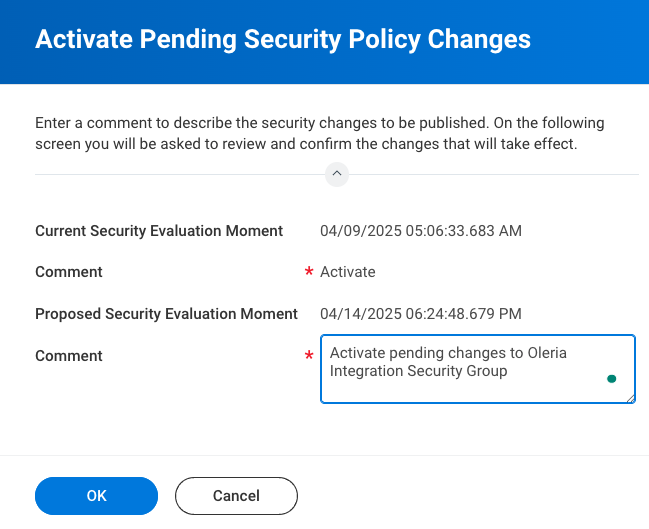
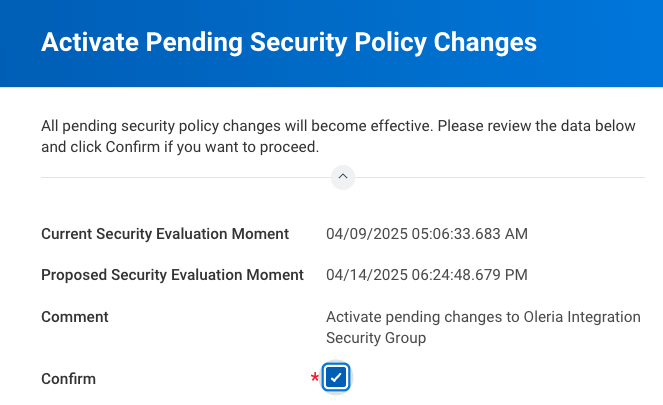
1.6. Active pending security policy changes
Type Activate Pending Security Policy Changes in the search window and select the task.
Provide a comment and click OK.
On the next screen, select the Confirm checkbox and click OK.
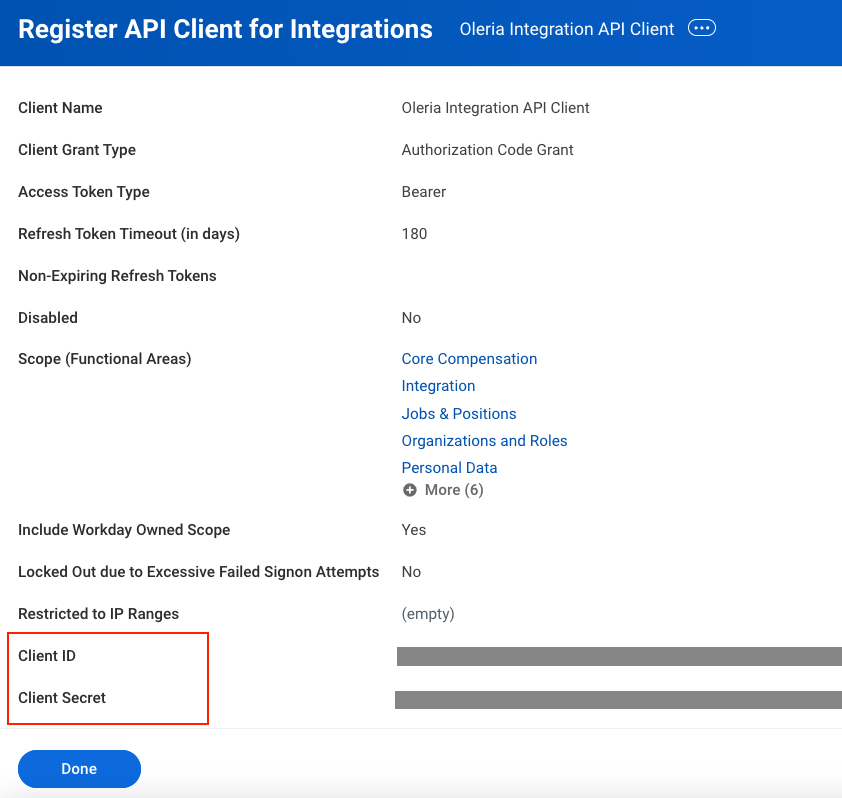
1.7. Register a new API client
Type Register API Client for integrations in the search window and select the task.
- Enter a name for your API client in the Client Name field.
- Unselect the Non-Expiring Refresh tokens checkbox
- Add 180 in the Refresh Token Timeout (in days)
- Search and add the following scopes in the Scope (Functional Areas)
- Integration
- Jobs & Positions
- Organizations and Roles
- Personal Data
- Public Data
- Staffing
- Tenant Non-Configurable
- Worker Profile and Skills
- Contact Information
- Select the Include Workday Owned Scope checkbox

Copy Client ID and Client Secret shown in the next page
1.8. Generate a refresh token
Type View API Clients in the search window and select the task.
Select API Client for Integrations
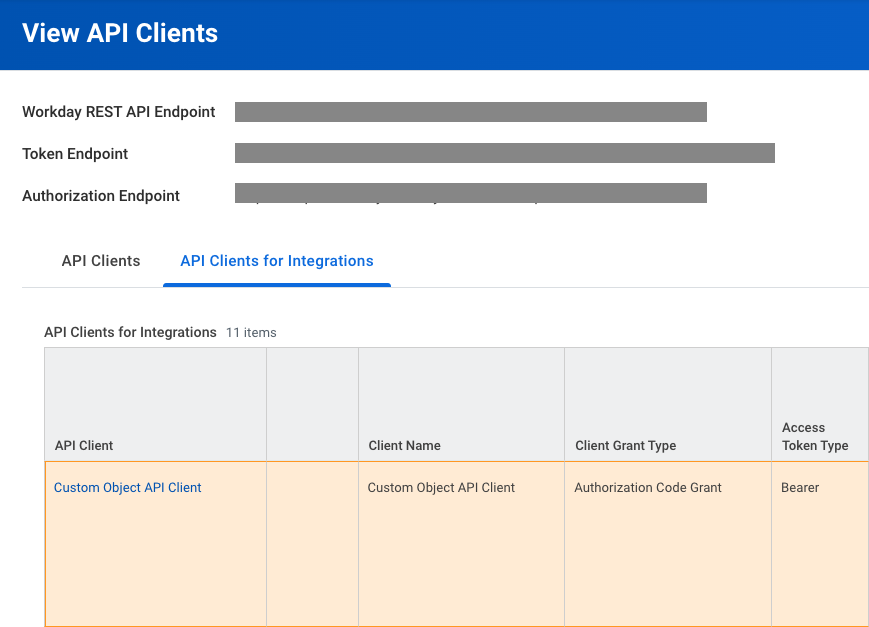
Select the API client registered in step 1.7
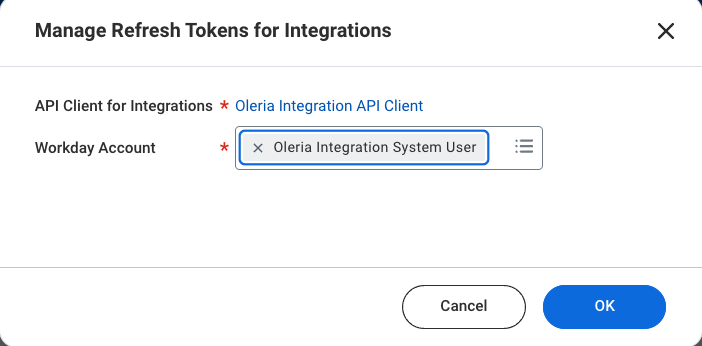
Select the eclipse → API client → Manage Refresh Tokens for Integrations
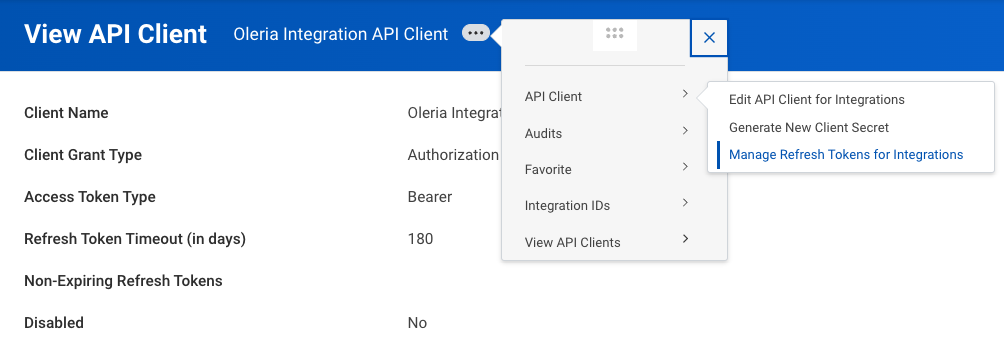
Search and select Oleria Integrartion System User created in the step 1.1
Click Ok.
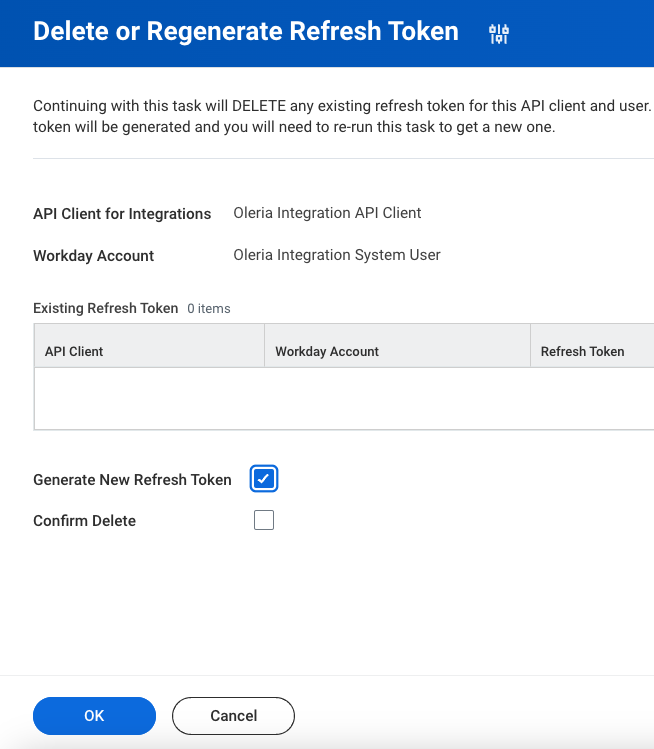
Delete or Regenerate Refresh Token opens, select Generate New Refresh Token checkbox.
Step 2: Integrate Workday with your Oleria Workspace
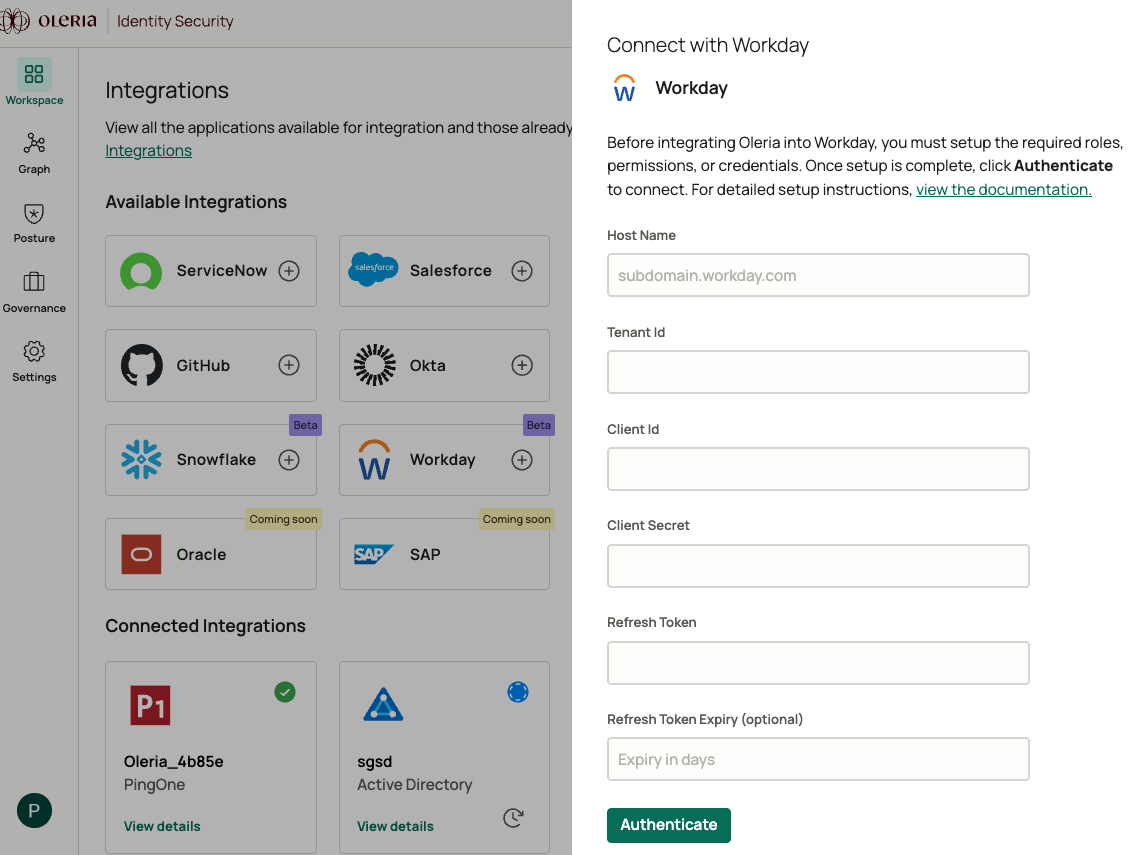
2.1. Go to your Oleria workspace, select Integrations → select Workday and provide the following
- Host Name: Your workday home URL
- Steps to find Host Name
- Login to Workday
- Search for ‘View API clients’ in the search bar
- ‘Workday REST API endpoint’ would be visible at the top of the page
- Steps to find Host Name
- Tenant ID: To find the tenant ID, select your account and the organization ID

- Client ID: Captured in step 1.7
- Client Secret: Captured in step 1.7
- Refresh Token: Captured in step 1.8
- Refresh Token Expiry (optional): Leave this field empty if a non-expiring refresh token was set up in step 1.7
2.2. Find the newly integrated Workday instance in your Oleria workspace connected integrations.
2.3. Select connected integrations → Workday → select View Details to open the side pane to view the agent health status.
Contact Us
For questions about this integration, please contact us at support@oleria.com.